buy Lyrica 50 mg From thekitchn.com
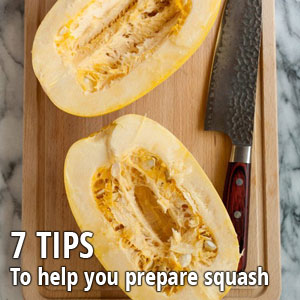 It’s easy to enjoy eating winter squash — these versatile vegetables taste good roasted, stuffed, pureed, or even baked into desserts like pies and muffins. Prepping these stubborn, hard vegetables is not enjoyable though, and I’m sure we’ve all struggled with peeling and cutting them.
Amanda Paa, author of the new cookbook Smitten with Squash, shared some tips and tricks with us to make prepping hard winter squash a lot safer and a whole lot less cringeworthy so that both fingers and nerves stay intact!
1. Stabilization is key.
“Nowhere else it as critical to stabilize what you’re working with in the kitchen as with winter squash, a notoriously difficult task because of the thickness and density. Your cutting board is like your canvas. To make sure it doesn’t slide around as you’re trying to cut the squash, put a damp towel underneath it first. Think of this like an artist tightening his drafting board.”
2. The size of your knife matters.
“The size and type of your knife makes a big difference. Often I see friends try and use a knife that does not have a long enough blade so they are constantly pulling it in and out of the squash to get all the way through it, or they use a bread knife because it seems like “sawing” it apart would work well – not so much. You’ll have sharp edges flying around like crazy, and the squash will be wiggling like a fish.”
“The best practice is to use a sharp large chef’s knife with at least an 8-inch blade. And the weight matters too – be sure it’s heavy and sturdy so that you’re in control, not the squash.”


3. Trim the ends first.
“The thickness and density of winter squash can make it a little intimidating. To set yourself up for success, trim the stem and root ends off first before making other cuts no matter which variety you’re working with. You’ll remove the toughest parts of the squash and create flat sides that you can stabilize on the cutting board without it wobbling around. Less wobbling means fewer chances for that knife to slip and cut you.”

4. Cut vertically through the squash.
“Like most fruits and vegetables, cutting through it vertically is the way to go, not horizontal. If the knife sticks, use a mallet to tap the back handle of the knife to continue to push it through.”
“Why cut vertically? This will speed up efficiency, and having to do fewer cuts through the squash means fewer opportunities to cut yourself. You’ll end up with even halves that lie nicely on a sheet pan for roasting and stuffing. Or, if you’re cutting it into wedges, cubes or dices, you’ll be able to make uniform shapes that will cook at the same speed.”

5. Peel with a knife, not a peeler.
“Another important tip? Put away the peeler and save that for cucumbers and carrots. It’s tiring, tedious and nearly impossible to get a good grip on the squash. With a sharp knife you’ll be able to make fewer cuts and have more control, and efficiency and safety are always a good combination.”
“Since I recommend using a knife, not a peeler, it’s important to keep your fingers out of the way. With the hand that’s stabilizing the squash, keep them away from the blade, even tucking them underneath themselves like a light fist if you can’t get a good grip.”

“It’s inevitable that you’ll get a few pieces that aren’t the shape you’re going for when cutting it up because the area where you scooped out the seeds is a little awkward. But no sweat, as long as they’re about the same thickness they’ll cook at the same rate.”

6. Remove the seeds and strings with a melon baller.
“Although it doesn’t seem dangerous to remove the seeds, I can definitely say I’ve bruised myself from the spoon slipping while scooping them out. Instead, use a melon baller, which has sharp edges that dig nicely into the flesh. You are able to coax the seeds out easily, and they don’t go flying on the kitchen floor. Bonus.”
7. Bake really stubborn squash into submission.
“Finally, if you start working on the squash and it just doesn’t seem to want to budge, take a deep breath and put that pesky thing in the oven at 375 degrees for 10 minutes. This will soften the skin and allow you to start the process much, much easier. Just to be sure to handle it with oven mitts.”